
WebDAV
WebDAV stands for Web-based Distributed Authoring and Versioning and it allows users to collaboratively modify and manage files on remote web servers.
Connecting with WebDAV
| Information | |
|---|---|
| Host | webdav-[account].alwaysdata.net |
| Ports | 80 (HTTP) or 443 (HTTPS) |
| Identifier | assigned user ([account]) and password |
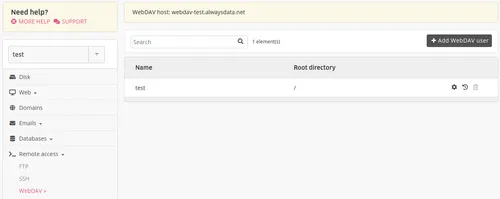
These users can be configured in the Remote access > WebDAV tab in your alwaysdata administration interface.
With Windows
-
Right click on the Workstation or Computer icon,
-
Choose Connect a network drive. From the Folder field, specify:
- in Vista and higher:
https://webdav-[account].alwaysdata.net/
- in Vista and higher:
-
Click on Connect under a different user name, then enter your identifiers. Validate and click on Finish.
With macOS
-
From the Finder, choose Go > Connect to server,
-
From the Server address field, enter
https://webdav-[account].alwaysdata.net/; -
Click on Connect.
With rclone (Linux / macOS)
rclone is a powerful tool for synchronizing and managing files on cloud storage services and network shares, including WebDAV.
Installation
Download and install rclone:
$ curl https://rclone.org/install.sh | sudo bashOr use your package manager:
# Debian/Ubuntu
$ sudo apt install rclone

# Fedora/RHEL
$ sudo dnf install rclone

# macOS
$ brew install rclone
Configuration
Create an interactive rclone configuration:
$ rclone configSelect the option to create a new remote and choose the webdav type. Then:
- Name your remote (e.g.,
alwaysdata); - Enter your WebDAV server URL:
https://webdav-[account].alwaysdata.net/; - Enter your WebDAV identifier (format:
[account](…)); - Enter your WebDAV password;
- Confirm the settings and save the configuration.
Usage
Once configured, you can:
List files:
$ rclone ls alwaysdata:Mount as a file system:
$ mkdir -p ~/alwaysdata
$ rclone mount [--daemon] --vfs-cache-mode writes alwaysdata: ~/alwaysdata
The --daemon option runs the process as a daemon and returns the shell. If you encounter the error Fatal error: failed to mount FUSE fs: fusermount: exec: "fusermount": executable file not found in $PATH, install the fuse3 package.
Synchronize files:
# Download from alwaysdata
$ rclone sync alwaysdata:/ ~/Documents/backup/

# Upload to alwaysdata
$ rclone sync ~/Documents/ alwaysdata:/
Note
Replace webdav-[account].alwaysdata.net with your WebDAV hostname available from Remote access > WebDAV.